
 Successful use of a snatch strap is not measured by how few times the attempts are made but by how safe the successful attempts are conducted.
To reduce the force required to unstick a vehicle all wheels should have an exit ramp made in the direction of the intended extraction. Remove as much of the build up of sand or mud under the vehicle.
Remember that the force to remove a vehicle resting on the tyres is far less than if the
under body has the load.
Unfortunately, the results of using a snatch strap incorrectly will cause serious damage or serious injury. Over the past four or five years the humble snatch strap has been misused unintentionally by most who have bought one off the shelf having had little understanding of how it works.
The resultant force that can be produced if mis-used, or attached to a part on the vehicle that is not designed for the force that will be applied, can kill!
At the peak of the strap’s power a force of up to 8 tonnes can be exerted. There are few attachments on the suspension or the body that can withstand these forces unless the point is designed for that purpose.
Most straps are designed to withstand forces in excess of what is required to extract a vehicle under normal conditions (far less than 8 tonnes), but a lack of understanding as to how the strap is designed to work often sees the strap poorly cared for.
The strap will be less effective if left with dirt in the fibres or loose on the floor of a vehicle where objects can wear or damage the fibres on the weave. These fibres are responsible for the elasticity, which provides the gradual application of force. This gradual application is how the pulling vehicle is able to transfer the kinetic energy to the bogged vehicle.
With due respect to Work Place Health and Safety guidelines we should take moral responsibility for our actions. All onlookers must be moved away at least 15 metres (for an 8m strap) at right angles to the strap. No one should be in front, behind or in between the vehicles.
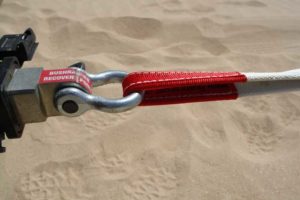
A person who has had the training or experience to ensure the strap loops cannot come off and are attached to the strongest point must check the attachments. In situations where a tow bar is the only point available (check with tow bar manufacturer before attaching the strap to yours), a bow shackle may have to be used. The largest shackle that will fit is a good guide.
Care must be taken to ensure the shackle is done up (back screw pin off half a turn as the load can over tighten a shackle screw pin) and ensure that the position of the shackle will be able to withstand the load.
The Recovery Procedure
-
- Assess all potential hazards, i.e. trees, rocks, tide, etc.
- Clear away any obstruction from wheels of the vehicle that is stuck (SHOVEL< TUNNEL< UNLOAD)
- Calculate TPR
- Lay strap flat, and check for fraying and do not use if damaged
- Reverse recovery vehicle up to bogged vehicle following 2 metre rule – 8 mtr strap 6mtr apart
- Connect to both vehicles using recommended anchorage points (preferably on same side)
- Spectators stand back 1.5 times the length of the strap at right angles
- Bogged vehicle drives in 1st or reverse depending on direction required
- Recovery vehicle drives in either 2nd gear or Drive (for auto) for momentum (usually about 2000-2500rpm)
- Follow signalling
2 Metre Rule
Lay strap out and shorten it by 2 metres of full length. Snake the extra 2 metres not bunched up and D-shackles/Bow shackles done up, then ½ turn undone.
Signalling
Bogged vehicle directs (seat belt on)
Window down
Horn or Lights
2 = Go 1 = Stop
Winchman directs
Hand Signals
Driver being towed is responsible for recovery signals when no winch man is present.